This post shows how to create a simple VSTO Powerpoint AddIn that adds a digital timer function to Powerpoint. Here is a showcase video:
Prerequesits
To follow along with this post, you need the following software installed on your machine:
- Visual Studio (I used VS2017 Community Edition)
- Microsoft Office PowerPoint
- Office-/Sharepoint Development Workflow (Visual Studio Installer)
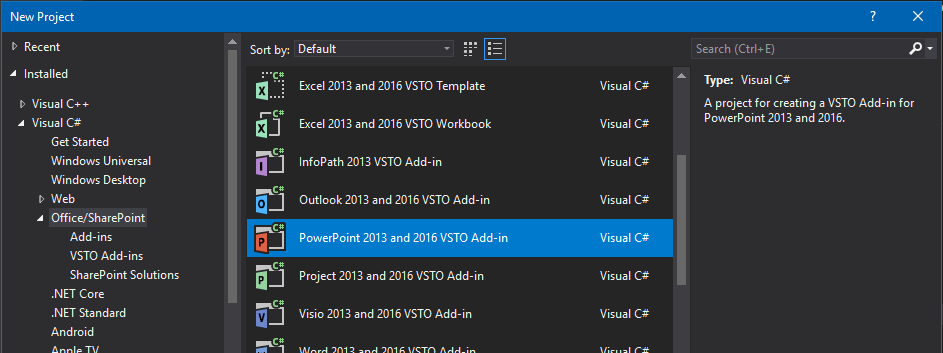
Lets get started! First, create a new project, select Office/Sharepoint -> PowerPoint VSTO Add-in.
We split the project into two parts:
- Part 1 – Add a button to the toolbar that puts a timer an the active slide.
- Part 2 – Timer information and life cycle handling
Part 1 – Adding a timer Button to the toolbar.
To add a button to the toolbar (the so called ribbon), we first need to add a new item called ‘Ribbon’ to the project. Right click on the project file, select Add und New Item. Find the item called Ribbon (Visual Designer), name it ‘TimerRibbon’ and click add. This will add three files to the project:
- TimerRibbon.cs – Contains a partially declared class. This is where our code for the ribbon, like button click handlers, goes.
- TimerRibbon.designer.cs – Contains the other part of the partial TimerRibbon class. This file is created by the ribbon designer. We don’t touch it.
- TimerRibbon.resx – Contains resources that are used for the ribbon. e.g. labels and the image for timer button.
Designing the ribbon
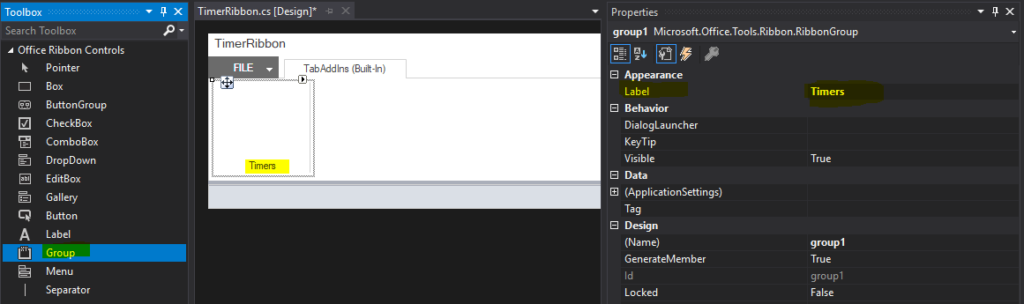
Let’s add a button to the ribbon: Open the ribbon designer by double clicking the TimerRibbon.cs file. We can customize the ribbon by dragging and dropping controls from the ToolBox window on to the ribbon. First, select the Group widget and drag on to the ribbon. Open the properties window and change the label property to ‘Timers’.
Second, go back to the ToolBar window and drag a button on to the created timers group. Change the ControlSize property of the button to RibbonControlSizeLarge. Now we can add a nice timer image to the button. To do that, click on the button with the three small dots next to the Image property. This opens a dialog that lets you select a image from the resource file. Since we did not import any images yet, we need to click the ‘import’ button.
Select a image from your disk or use this one: http://thecolorofcode.com/wp-content/uploads/2019/01/Icon1.png. This will add the selected image to the resource file and use it as button image.
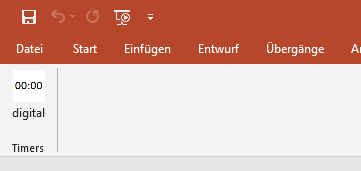
We have almost finished the designer part. The last thing we need to do is to give the button a proper label and set an descriptive name. Set the Label property to ‘digital’ and the Id property to ‘AddDigitalTimerButton’.
The design part is already over. If we hit F5 in Visual Studio, PowerPoint launches and we will find our ribbon and the digital timer button on the ‘AddIns’ tab of the PowerPoint window.
Implementing the click-handler
Now to the fun part. Lets add a click handler and some code to the button. This is done by double-clicking the AddDigitalTimerButton in the ribbon designer window. Doing so will switch the view from the designer to the code window where a new Methode called AddDigitalTimerButton_Click() was added. This method is where our logic goes. First we want to get the active slide and then we are going to add a special Textbox that acts as our timer. Here is the final code in TimerRibbon.cs
    public partial class TimerRibbon
    {
        private void AddDigitalTimerButton_Click(object sender, RibbonControlEventArgs e)
        {
            var slide = FindActiveSlide();
            if(slide != null)
            {
                AddDigitalTimerTextToSlide(slide);
            }
        }

        private Slide FindActiveSlide()
        {
            var app = Globals.ThisAddIn.Application;
            if (app.ActivePresentation.Slides.Count > 0)
            {
                return app.ActiveWindow.View.Slide;
            }
            else
            {
                return null;
            }
        }

        private void AddDigitalTimerTextToSlide(Slide slide)
        {
            // Center the textBox on the Slide
            // 1. Calculate the top left corner
            const float textBoxWidth = 180;
            const float textBoxHeight = 45;
            Presentation currentPresentation = Globals.ThisAddIn.Application.ActivePresentation;
            float slideHeight = currentPresentation.PageSetup.SlideHeight;
            float slideWidth = currentPresentation.PageSetup.SlideWidth;
            float x = (slideWidth - textBoxWidth) * 0.5f;
            float y = (slideHeight - textBoxHeight) * 0.5f;
            // 2. Place the slide
            var textBox = slide.Shapes.AddTextbox(
                MsoTextOrientation.msoTextOrientationHorizontal,
                x, y, textBoxWidth, textBoxHeight);
            textBox.TextFrame.TextRange.Text = Constants.DefaultTimeString;
            textBox.TextFrame.TextRange.Font.Size = 64;
            textBox.Tags.Add(Constants.TimerTagName,
                Constants.DigitalTimerTagValue);
        }
To find the active slide, we access the PowerPoint application object using the generated Globals class. The app has a property called ActivePresentation that we can use to query the slide count. If there is at least one slide, we can use the ActiveWindow property to find the slide that is currently being displayed in the PowerPoint window using app.ActiveWindow.View.Slide. If there are no slides in the presentation, we just return null. (foolhardy, i know… 😉 )
The next step is to add a Textbox, that acts as our timer, to the center of that slide. This is done by the method AddDigitalTimerTextToSlide(Slide). First sub step here is to calculate the bounding box of the centered Textbox. We set the with and height of our Textbox to a fixed size of 180×45 pixels and query the slides width and height using the Application.ActivePresentation.PageSetup.SlideWidth/Height property. The x- and y-coordinate of the top left corner can than easily be calculated.
With the coordinates of the top left corner and the box’s width and height, we can create a Textbox by calling slide.Shapes.AddTextbox(…) . This method returns a shape object. We need to set some more values on that shape. First we want to set the default text. This will act as our default time duration. I created a Constants class to hold all constant values that are used multiple times or from different classes. The default time is one of this values. It is set to ’05:00′ (five minutes). We set the text of our timer by setting the textbox.TextFrame.TextRange.Text property. Once that is done we set the font size to 64 by setting the textbox.TextFrame.TextRange.Font.Size property.
From shape to timer
By now, the added Textbox is just that, a simple textbox. If we want to use it as a digital timer and count down its seconds, we need a way to find this exact text box once the slide is shown during the slideshow. To do this we use the shape’s Tag-List and add a special tag named ‘TimerName’ and assign it the value ‘DigitalTimer’. Both the tag name and the tag value are stored in the Constants class to access is from somewhere else later. Adding the tag to the shape is done by calling textbox.Tags.Add(Constants.TimerTagName, Constants.DigitalTimerTagValue). And that’s it. Pressing F5 to run the AddIn in PowerPoint and clicking our button will add a Textbox that is tagged as ‘digital timer’ to the center of the active slide.

Part 2 – Implementing the timer logic
Now that the timer shape is added, we need to decrease its text/time (05:00) every second once the slide is shown in a slideshow. To do so, we need a method that is invoked whenever the slide is changed during a slideshow. Luckily there is an event that does just that. Its called SlideShowNextSlide and can be accessed via the PowertPoint.Application object. Another thing we need to take care of is to dispose running timers when the slideshow ends. To get a method that is invoked when the slideshow ist stopped we subscribe to the SlideShowEnd event.
We want to attach the event handlers as soon as the add-in is being loaded. The generated ThisAddIn-class already comes with two life cycle methods. One, called ThisAddIn_Startup(…), that gets invoked when the add-in is loaded, and another one, called ThisAddIn_ShutDown(…), that gets invoked when the AddIn is unloaded. Lets use the startup method to register the event handlers and put our timer logic in that class. Here is the code for the life cycle hooks:
        private void ThisAddIn_Startup(object _, EventArgs _)
        {
            this.Application.SlideShowNextSlide += OnNextSlide;
            this.Application.SlideShowEnd += OnSlideShowEnd;
        }

        private void OnNextSlide(SlideShowWindow wn)
        {
        }

        private void OnSlideShowEnd(Presentation p)
        {
        }
Whenever a slide is activated during a slideshow, we need to do the following things:
- Check if there are timers running from a previous slide. If yes: restore their duration and dispose them.
- Check if there are Textbox shapes with the timer tag on the activated slide. if no, we are done with this slide, if yes:
- Store the current text (the time) of every Textbox to restore it later.
- Start a timer that decrements the time value every second if its not already ’00:00′.
- Store the timer information so that it can be disposed later.
And for the cleanup: When the slideshow ends, we need to check if there are still timers running and dispose them.
Storing information about running timers
To store the information about a running timer (e.g. Its configured duration) we create a new class called TimerData:
    class TimerData : IDisposable
    {
        private static readonly TimeSpan OneSecond = TimeSpan.FromSeconds(1);

        private readonly Timer _timer;
        private readonly string _duration;
        private readonly Shape _timerShape;

        public TimerData(Shape timerShape)
        {
            _timer = new Timer(OneSecond.TotalMilliseconds);
            _timer.Elapsed += TimerTick;
            _timer.Start();
            _timerShape = timerShape;
            _duration = GetShapeText();
        }

        private void TimerTick(object _, ElapsedEventArgs __)
        {
            string timeText = GetShapeText();
            if(TimeSpan.TryParseExact(timeText, "mm\\:ss",
                CultureInfo.InvariantCulture, out TimeSpan time))
            {
                if (time.TotalSeconds == 0)
                    return;
                time = time - OneSecond;
                SetShapeText(time.ToString("mm\\:ss"));
            } else
            {
                SetShapeText($"Invalid format: {_duration}");
            }
        }

        private void SetShapeText(string text)
        {
            _timerShape.TextFrame.TextRange.Text = text;
        }

        private string GetShapeText()
        {
            if (_timerShape.HasTextFrame == Microsoft.Office.Core.MsoTriState.msoTrue)
            {
                return _timerShape.TextFrame2.TextRange.Text;
            }

            return "No text found.";
        }

        public void Dispose()
        {
            SetShapeText(_duration);
            _timer.Dispose();
        }
    }
An instance of this class will be created for every timer shape on the active slideshow slide. The constructor takes the timer Textbox Shape as argument. The shape is being stored in a field called _timerShape. The start duration of the timer is being stored in the field _duration after calling the GetShapeText() method. Besides that, a Timer-object is beeing created, configured and stored in a field, so that the TimerTick(…) method gets called every second after the object has been created.
The tick method is where the timer magic happens. First we read the current text (or time) of the timer shape by calling GetShapeText(). Next we parse the text using TimeSpan.TryParseExact(…) using the ‘mm:ss‘ pattern string. If parsing was successful, we check if the timer is already finished (00:00). If not we subtract one second and update the Textbox with the new duration by calling SetShapeText(..) using the ‘mm:ss’ pattern again.
To restore the duration of our timer and cleanup the timer object the TimerData class exposes the Dispose() method.
Finding, creating and disposing timers during the slideshow
With this class it is easy to implement the slideshow logic as listed above. The only thing we still need is a way to store an instance of TimerData for every timer on the active slide. That’s the job of the_activeTimers list:
    public partial class ThisAddIn
    {
        private List<TimerData> _activeTimers = new List<TimerData>();

        private void ThisAddIn_Startup(object sender, EventArgs e)
        {
            this.Application.SlideShowEnd += OnSlideShowEnd;
            this.Application.SlideShowNextSlide += OnNextSlide;
        }

        private void OnNextSlide(SlideShowWindow Wn)
        {
            // Dispose timers from previous slide
            DisposeAllActiveTimers();
            // Check activated slide for new timers
            Slide activatedSlide = Wn.View.Slide;
            _activeTimers = FindTimersOnSlide(activatedSlide)
                .Select(timerShape => new TimerData(timerShape))
                .ToList();
        }

        private void OnSlideShowEnd(Presentation Pres)
        {
            DisposeAllActiveTimers();
        }

        private void DisposeAllActiveTimers()
        {
            _activeTimers.ForEach(t => t.Dispose());
            _activeTimers.Clear();
        }

        private IEnumerable<Shape> FindTimersOnSlide(Slide slide)
        {
            foreach (Shape shape in slide.Shapes)
            {
                if (shape.Tags[Constants.TimerTagName] == Constants.DigitalTimerTagValue)
                {
                    yield return shape;
                }
            }
        }

        private void ThisAddIn_Shutdown(object sender, System.EventArgs e)
        {
        }

        // generated code was stripped.
    }
In the OnNextSlide(…) event handler, we first iterate over all active timers and dispose them. Then we search for shapes on the activated slide that are tagged as timers using FindTimersOnSlide(…). For every timer Textbox found this way, we are creating a TimerData instance that holds the timers information and store it in the active timers list. When the slide show ends, we again iterate over all active timers and dispose them using DisposeAllActiveTimers().
And this is it! Hit F5 to open PowerPoint, add a few timers and start the slideshow to see them count down.
I hope this post was helpful to you. The code for this post with the complete visual studio solution can be found on Github.
Nice job! This was a very useful tutorial in understanding the nuances using C# and PowerPoint’s APIs. This is can add value to a person’s PowerPoint presentations. Thank you.
Hey there,
Lars here. I was looking for that exact example and followed your instructions. As I am new to programming Add Ins and I’m not a real programmer at all, I’ve encountered an issue.
I am using the timer for a presentation, which is also running a macro at the same time.
The Timer by itself works perfectly fine, but the timer connected with my macro (Visual Basic), doesn’t seem to work. Do I have to do something with the code to tell it to work with a different thread then the rest of the powerpoint? Or have you encountered something similar before?
It would be great, if you can help me out.
Kind regards
Hi this was super helpful thank you for detailing this. One question; let’s say that I wanted to alter the code logic so that it counts up rather than down, and displays the running time of the show on every slide rather than just the slide that is active when the timer button is selected. How difficult would this be?